Reading Time: 14 minutes read
Capturing your most cherished moments via your iPhone device is simple – and more often than not, it produces an excellent photo.
Once the photo is captured – it’s there for as long as you need it, safely stored on your iPhone.
But, how do you go about transferring the saved photos on your iPhone to your computer?
Perhaps you want to do the opposite? Moving photos stored on your computer to your portable iPhone device so you can show them to your friends and family whenever you like?
The good news is that this is a very straightforward task. The even better news is that we’ve got all the instructions you need to perform this action right here.
So, before scrolling down – it might be worth your while to at least bookmark this page before you get started. Just so you have this information close to hand whenever you need it.
What files can be viewed on my iPhone?
Let’s start with the basics.
Depending on what operating system you’re running (iOS), typically an iPhone will save an image in JPEG format as a default.
Before you even attempt to transfer photos, it’s important to get an understanding of the types of files your’re dealing with.
However, the following file formats can be stored and displayed in the Photos app for iOS:
- JPEG
- PNG
- TIFF
- GIF (iOS 11 and above)
- HEIF (iOS 11 and above)
- RAW
- Live photos
- MP4 videos
- HEVC videos (iOS 11 and above)
- Slo-mo videos
- Timelapse videos
JPEG images are compatible with near enough every image processing application you can think of – which means they can be viewed and transferred across different devices easily (which is obviously ideal in this scenario).
On the other hand, images shot with iPhone cameras running newer iOS 11 and iOS 12 software default to storing pictures as HEIF (High Efficiency Image Format).
HEIF images allow for greater file compression – which means that images saved in this format will normally take up less storage space in your image library than a JPEG file.
However, as mentioned above – images saved in JPEG format are arguably more broadly compatible for sharing and copying to a computer, so you might prefer using JPEG (in which case you might have to amend your camera settings if you’re running iOS 11 or iOS 12).
If you’re moving photos from your computer to your iPhone – you’ll want to ensure that you’re photos are saved in one of the file formats listed above so that they can be saved and viewed on your device.
How to upload photos with iCloud Photo Library
Much like having some familiarity with the types of image formats you’re dealing with, it’s also important to know your way around the iCloud Photo Library.
This is one of the most simple ways to transfer photos across different Apple devices – because if you have your iCloud Photo Library enabled, all of your photos will be stored there.
This makes image and video storage, sharing and syncing easier – whether your uploading to and from a Mac or to and from a Windows PC using the iCloud for Windows app.
How to upload photos and video if you have iCloud Photo Library enabled
If you have iCloud Photo Library enabled alongside iCloud Photo Sharing on your portable iPhone device and Mac – this is simply a case of accessing your library from the Photos app on your Mac (go to system preferences on Mac to switch on iCloud Photo Library if it isn’t already enabled).
From here, you can find your library of saved images along with any new photos that you’ve recently synced to iCloud.
Provided the image/video files you want to download to your computer are in a supported format – all you need to do is select them and then click the ‘sync’ button in the top right corner of your screen in the Photos app.
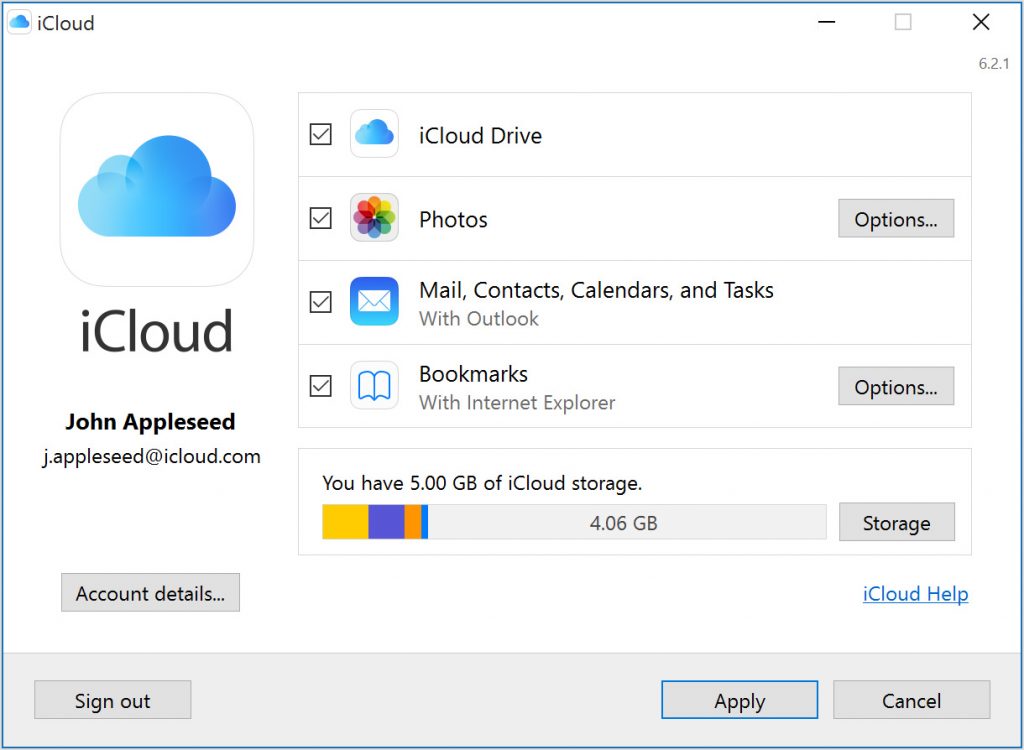
How to transfer from PC to iPhone using the iCloud for Windows app
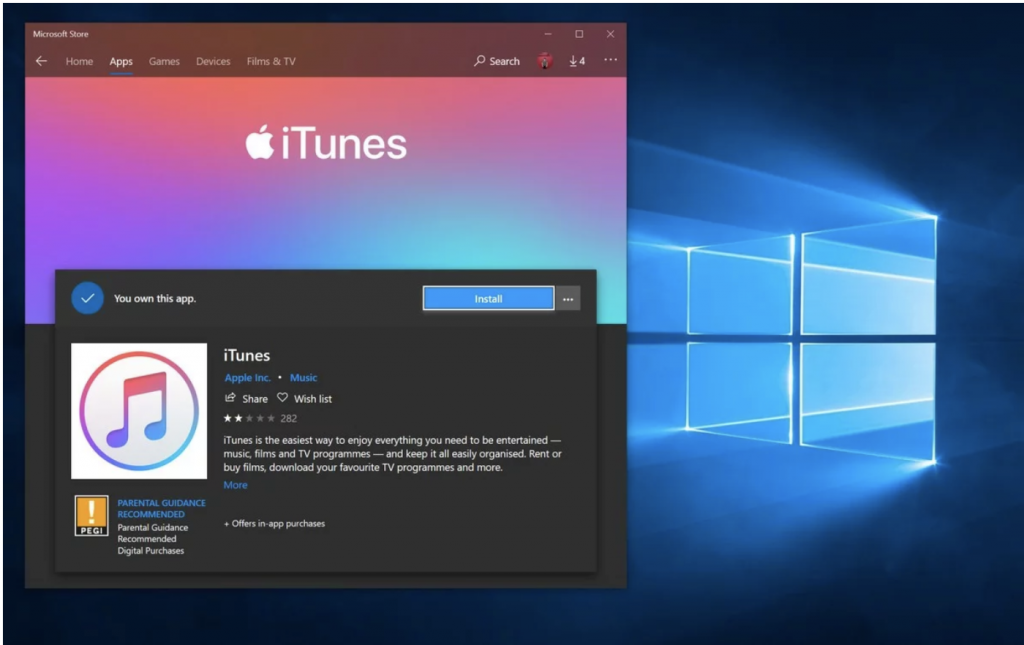
First of all, if you haven’t downloaded the free iCloud for Windows desktop software, you’ll need to do that (ensure that the iCloud Photo Library has also been enabled on your portable device first).
- Search for the app in you web browser and click ‘download’.
- Wait for the download to finish, and then click on the file to run the installer.
- Once the download is complete – click on the new icon on your desktop to run the software.
- Then, you’ll need to sign in to your Apple ID account.
- Click the ‘Options’ button next to the Photos app.
- Tick the box to enable iCloud Photo Library and click apply.
- Your photos and videos will then be available for download to your PC – a new icon called ‘iCloud Photos’ will appear on your desktop.
How to import photos from iPhone to Mac
If you don’t use iCloud Photo Library – there’s no need to panic.
There are other ways to import photos from your iPhone to Mac.
How to transfer photos from iPhone using iTunes
In order to manually sync photos using iTunes, you’ll need to ensure that you have the latest possible version of iTunes installed.
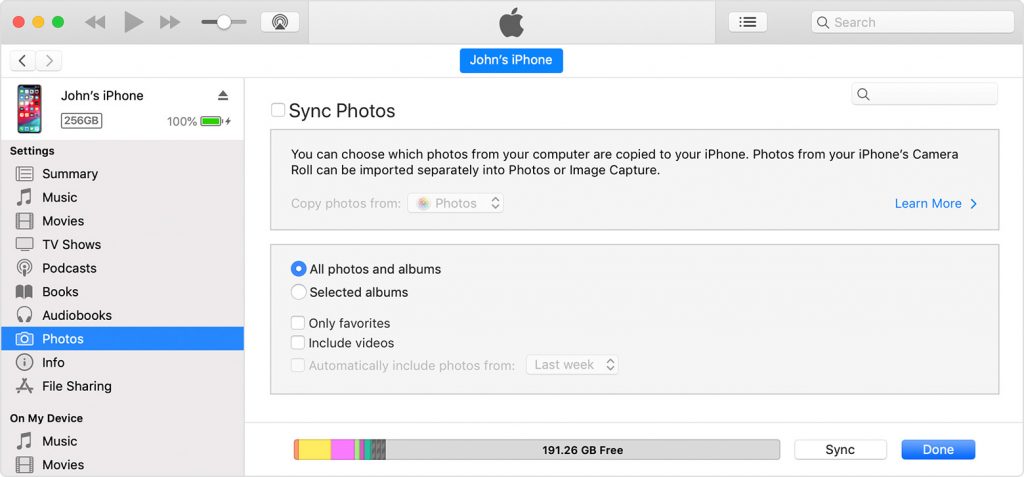
(image source: https://support.apple.com/en-gb/HT201313)
- Open iTunes from your Mac desktop.
- Connect your iPhone manually via USB cable.
- Click the iPhone device icon that appears in the top navigation in iTunes once your phone is connected.
- A sidebar menu will then appear. Click ‘Photos’.
- Tick the box next ‘Sync Photos’ and select the app or folder you want to sync from within the Photos app of your device (select ‘Include videos’ if you want to sync any video files).
- Click ‘Apply’ and you’re good to go!
How to transfer photos from iPhone using AirDrop
To use AirDrop, at the very least you’ll need an iPhone 5 or newer running iOS 7 or above.
You’ll also need a Mac computer that post dates 2012 – running OS X 10.10 Yosemite or above. If you tick these boxes – transferring iPhone photos to Mac using AirDrop should be straightforward.

- Select the photos you want to transfer from your iPhone and tap the sharing icon.
- Launch the Photos app on Mac and select AirDrop in the sidebar menu. From the ‘allow to be discovered by’ option – select ‘Everyone’ or ‘Contacts Only’.
- Once you’ve tapped the sharing icon on your iPhone, you can select AirDrop. Your Mac device should then appear as an option.
- Select your Mac device – and then the images you’ve selected will instantly start to transfer across.
How to copy photos from iPhone to PC
Not everybody has an iPhone and a Mac.
You might have a different type of PC at home – in which case, there are different ways you can copy your photos across from iPhone.
How to transfer photos from iPhone using File Explorer or Windows Explorer
Using a Windows operating system, you’ll already have File Explorer installed by default.
- Manually connect your iPhone using a USB cable.
- Launch Windows Explorer.
- In the sidebar menu, click ‘This PC’ and select your device.
- In the Device’s folder – proceed through Internal Storage > DCIM. This will then display all of the images saved on your iPhone.
- Select the images you want to transfer and click ‘Copy to’ in the top menu.
- Copy the images to a chosen file on your personal drive – and you can access them whenever you need them (provided their saved in a supported format, of course).
How to transfer photos from iPhone using Windows Photos (or other applications)
The Windows Photos app is available for Windows 10 users, and provides an alternative route for those with an iPhone to upload photos to their PC.
- Manually connect your iPhone using a USB cable.
- Launch Windows Photo app.
- Select ‘Import’ in the top right corner.
- Select ‘From a USB device’.
- Then manually select the photos you want to import. It’s as simple as that. These will then be saved in the app.
How to transfer photos from Mac to iPhone
If you use your Mac as your main place for photo storage, this section is probably more useful for you.
As explained above, photos can be accessed seamlessly across different devices provided they enable and link to your iCloud Photo Library.
However, transferring photos saved on Mac across to iPhone or iPad can be done in a number of different ways.
How to use iTunes to transfer photos from your Mac to your iPhone or iPad
If you’re not a fan of iCloud, you could always use iTunes.
If you use iPhoto or the Photos app on Mac, you’ll want to organise the photos you want to transfer into one place – ready to go.
- Manually connect your iPhone or iPad using a USB cable.
- Launch iTunes
- Click on the device, and select the Photos tab in the sidebar menu that appears.
- Tick the box alongside ‘Sync Photos’.
- In the dropdown menu next to ‘Copy photos from’ – select the folder containing the photos you want to transfer.
- Click Apply and you’re ready to go.
How to use AirDrop to transfer photos from your Mac to your iPhone or iPad
If your Mac supports AirDrop – you might find this to be an even quicker and easier solution to transfer batches of photos and videos all at once.
- Go to where your photos and videos are stored – and select the ones you would like to transfer.
- Open a separate tab on your Mac and select AirDrop from the side menu.
- Swipe up on your iPhone and tap AirDrop. Make sure it’s set to ‘Everyone’.
- Your device will then appear in the new tab you’ve opened on your Mac. You can now start moving your photos across into the separate tab – the files will then copy over on to your device.
How to use Dropbox to transfer photos from your Mac to your iPhone or iPad
Dropping images saved on your Mac into your Dropbox (if you have one), and then accessing them via the Dropbox app for iPhone or iPad is another simple solution.
Dropbox is obviously an online storage space – so you’ll want to copy images (rather than sync them straight to Dropbox) in order to avoid any sync issues and losing files.
It’s also worth noting that you only get 2GB of free storage space with Dropbox – so it might not be the best option for bulk file transfers.
How to transfer photos from PC to iPhone
Don’t just assume you won’t be able to transfer photos across to your iPhone is you don’t have a Mac.
There are a number of options for standard PC users – whether that’s using iTunes, Google Drive, Dropbox or OneDrive.
The choice is yours.
How to use iTunes to transfer photos from your PC to your iPhone or iPad
This is near enough the exact same process you’d follow when using iTunes on Mac.
- Manually connect your iPhone or iPad using a USB cable.
- Launch iTunes
- Click on the device, and select the Photos tab in the sidebar menu that appears.
- Tick the box alongside ‘Sync Photos’.
- In the dropdown menu next to ‘Copy photos from’ – select the folder containing the photos you want to transfer.
- Click Apply and you’re ready to go.
How to use Google Drive to transfer photos from your PC to your iPhone or iPad
You can also send pictures from your PC to your iPhone using Google Drive (if it’s something you use frequently).
With a Google account – you automatically get 15GB of free Google Drive storage – which is plenty of room for any photos you want to transfer across.
First and foremost however, you’ll need to ensure that Google Drive is installed on your iOS device before you proceed.
- Open Google Drive on your PC and create a folder containing all of the files you want to transfer.
- Then, access Google Drive from your iOS device. Click to open the folder and then download to your Photos app. It’s literally that simple.
How to use Dropbox to transfer photos from your PC to your iPhone or iPad
Again, this is exactly the same process as with a Mac.
Simply drop images into your Dropbox and access them via the dedicated app on you iOS device.
Remember, you don’t get as much free storage with Dropbox as you do with Google Drive – so only use Dropbox for small file transfers if you can help it.
How to use OneDrive to transfer photos from your PC to your iPhone or iPad
As far as storage is concerned, OneDrive is a happy medium between Dropbox and Google Drive – with 5GB of free storage.
In order to use OneDrive to transfer photos from your PC to your iPhone or iPad, you’ll need to make sure they have the OneDrive app installed.
From there, it’s exactly the same process as Google Drive photo transfer:
- Open OneDrive on your PC and create a folder containing all of the files you want to transfer.
- Then, access OneDrive from your iOS device. Click to open the folder and then download to your Photos app.
Other image syncing service for your iPhone or iPad
It doesn’t end there, either. Believe it or not, there are other avenues you could explore to make simple photo uploads even easier.
Third-party photo providers like Amazon’s photo service, or even Adobe Creative Cloud can be used to transfer files via apps available for iOS devices, Mac and PC.
Amazon Photos works seamlessly with Amazon Cloud (in the same way that Google Photos works with Google Drive), whereas Adobe Creative Cloud is generally the go-to service for those with more of a keen interest in photography and design.
However, if you’re looking to use sync some of your best memories for a particular creative project – Motif can help your photos realise their full potential.
Once you’ve transferred all of your files into Apple Photos – Download the Motif App to run as a native extension.
This enables you to create beautiful photobooks, calendars and cards – and generally make the most of your digital image collection.